Learn how to create a natural look that shines in photos. Discover skincare prep, makeup techniques, and product tips for flawless, camera-ready skin.
To look natural in photos, start with healthy skin, use light layers of makeup, match your undertone, and avoid SPF flashback. Focus on strategic highlighting and soft definition rather than heavy coverage, and always test your look in similar lighting before the event.
Why Natural Looks Photograph Better Than Heavy Makeup
Heavy makeup can look caked and unnatural in photos, especially with flash. A natural look enhances your features without masking them, so you still look like you—just more polished. In Pakistan’s bright, harsh sunlight, thick foundation can melt and crease, making you look older. A lightweight approach keeps your skin looking fresh and lets your natural radiance show through.
Cameras capture contrast and texture more than the human eye does. That means overly matte skin can look flat, while too much shimmer can look greasy. The key is balance: soft, diffused light on your skin and subtle definition on your features. When you use less product, there’s less to go wrong—no patchiness, no flashback, no obvious lines where your foundation ends.
Moreover, natural makeup is more forgiving. If you need to touch up, it’s easy. And in photos, the focus stays on your eyes and smile, not on your makeup. This is why brides and models often opt for a “no-makeup” makeup look: it’s timeless and flattering in any lighting.
Another advantage: natural looks photograph well in both black and white and color. Heavy contouring can look severe in black and white, but soft shading translates beautifully. So if you want versatility, go natural.
Skincare Prep: The Foundation of a Photo-Ready Face
Great makeup starts with great skin. If your skin is dry, flaky, or oily, makeup will emphasize those issues. A consistent skincare routine smooths texture, evens tone, and creates a canvas that needs less makeup. According to the American Academy of Dermatology, gentle cleansing, moisturizing, and sun protection are the cornerstones of healthy skin.
Start with a gentle cleanser suitable for your skin type. Avoid harsh scrubs before an event—they can cause redness and micro-tears that makeup will cling to. Instead, exfoliate mildly two days before. Hydration is crucial: drink plenty of water and use a hydrating serum with hyaluronic acid to plump fine lines. Moisturizer should be lightweight but nourishing; let it absorb fully before makeup.
Sunscreen is non-negotiable, but for photos, choose a formula without titanium dioxide or zinc oxide if you’ll be photographed with flash—these ingredients cause a white cast. Chemical sunscreens or those labeled “flash-friendly” are better. If you’re prone to shine, use a mattifying primer only on your T-zone.
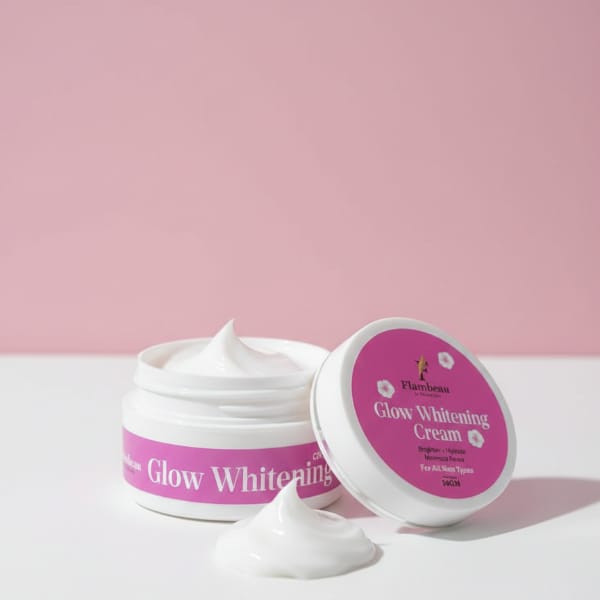
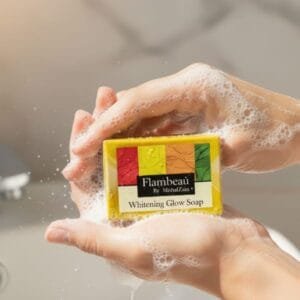
For an extra glow, consider a brightening product like Glow Whitening Cream – Brighten & Hydrate for All Skin Types. It hydrates while gradually improving skin tone, so you need less foundation. Pair it with a gentle cleanser like Whitening Glow Soap to maintain a clear, radiant complexion.
Don’t forget your lips: exfoliate gently and apply lip balm. Flaky lips ruin even the best lipstick. And get plenty of sleep the night before—no makeup can hide tired eyes completely.
Step-by-Step: Creating a Natural Look That Photographs Well
Follow these steps for a flawless, camera-ready face. Remember, the goal is to enhance, not mask.
1. Prime selectively. Use a blurring primer on areas with large pores or fine lines. Avoid all-over silicone primers if you have dry skin—they can ball up. A hydrating primer is better for dry patches.
2. Choose a lightweight foundation or tinted moisturizer. Match it to your neck, not your hand. Apply with a damp sponge for a seamless finish. If you have acne or dark spots, use a peach or orange color corrector sparingly before foundation. Less is more—you can always add another thin layer.
3. Conceal only where needed. Under-eye circles, blemishes, and redness around the nose. Use a creamy concealer that matches your skin exactly. Set with a tiny amount of translucent powder—only where you crease.
4. Add warmth with a cream blush. Cream blends seamlessly into skin and looks like a natural flush. Apply to the apples of your cheeks and blend upward. For photos, avoid heavy contouring; instead, use a subtle bronzer on your temples and jawline.
5. Define your eyes softly. Skip harsh black liner. Use a brown pencil or eyeshadow to tightline and smudge a little at the roots. Curl your lashes and apply one coat of lengthening mascara—waterproof if you might tear up. Fill your brows with a spoolie and brow powder, using short strokes.
6. Highlight strategically. A cream highlighter on your cheekbones, cupid’s bow, and inner corners of eyes adds dimension without looking glittery. Avoid heavy shimmer on your nose or forehead—it can look oily in photos.
7. Lips: tinted balm or soft lipstick. A satin or sheer finish looks more natural than matte. Choose a shade close to your natural lip color, just slightly enhanced. Blot with tissue for a stained effect.
8. Set everything lightly. A fine mist of setting spray merges all layers and prevents a powdery look. Don’t over-powder—shine is fine as long as it’s in the right places (cheekbones, not forehead).
9. Check your look in different lighting. Natural light is best. Take a selfie with flash to see if any product flashes back. Adjust as needed.
Common Mistakes That Ruin Natural Looks in Photos
Even with good intentions, certain habits can sabotage your photo-ready face. Here are the most common pitfalls and how to avoid them.
Over-powdering. A matte face looks flat and lifeless in photos. If you have oily skin, blot with sheets instead of adding powder. For dry skin, skip powder entirely except under the eyes.
Using SPF with flashback. As mentioned, physical sunscreens with zinc or titanium dioxide reflect flash, giving a ghostly white cast. Check your foundation and moisturizer for these ingredients. If you must use them, save them for non-flash days.
Harsh contouring. Heavy dark lines down your cheeks look unnatural in real life and terrifying in photos. Opt for a subtle bronzer instead. Blend, blend, blend—any visible line will be amplified by the camera.
Shimmery everything. A little highlight is good; a disco ball is not. Keep shimmer on the high points of your face and away from areas prone to shine.
Wrong foundation shade. A mismatched foundation is obvious in photos, especially with flash. Always test in natural light and wait 10 minutes for oxidation. If in doubt, go slightly lighter rather than darker—you can warm it up with bronzer.
Neglecting your neck and ears. Blend foundation down your neck to avoid a mask line. And don’t forget your ears—they show in profile shots.
Overdoing brows. Instagram-style bold brows can look severe in real life. Use a lighter hand and feathery strokes.
Not setting your makeup. A good setting spray keeps everything in place, especially in humid Pakistani weather. But avoid heavy setting sprays with alcohol if you have dry skin.
Choosing Products: What to Look For and What to Avoid
When shopping for photo-friendly makeup, read labels and consider your skin type. Here’s what to prioritize.
Foundation: Look for light-to-medium coverage with a satin or natural finish. Ingredients like glycerin and hyaluronic acid help hydrate. Avoid heavy silicones if you’re acne-prone. For oily skin, choose oil-free formulas. For dry skin, avoid mattifying foundations.
Concealer: Creamy but not greasy. It should be one shade lighter than your foundation for under-eyes, but match exactly for blemishes. Avoid concealers with high alcohol content—they dry out and crease.
Blush and bronzer: Cream or liquid formulas blend best for natural looks. Powder is okay if finely milled. Look for shades with a hint of warmth—peach, coral, or soft rose for blush; neutral brown for bronzer. Avoid orange or grey tones.
Eyeshadow: Matte or satin neutrals are your best bet. A small palette with a light beige, soft brown, and a deeper brown for definition is all you need. Avoid glitter chunks—they don’t photograph well.
Mascara: Lengthening and separating formulas are better than volumizing for a natural look. Waterproof is safer for events, but it can be drying. If you have sensitive eyes, choose a tubing mascara.
Lips: Tinted balms, sheer lipsticks, or lip stains. Look for hydrating ingredients like shea butter or jojoba oil. Avoid long-wear matte liquids that crack.
Setting spray: Choose one that is alcohol-free and gives a dewy or natural finish. A fine mist is key—a coarse spray can disrupt your makeup.
Also, consider the season. In Pakistani summers, you’ll want lighter, sweat-resistant products. In winter, you can use richer creams. Always patch test new products to avoid allergic reactions.
Adapting to Different Skin Types and Budgets
Your skin type and budget shouldn’t stop you from achieving a natural photo-ready look. Here’s how to tailor the steps.
Oily Skin
Use a mattifying primer only on your T-zone. Choose oil-free foundation and set with a light dusting of translucent powder. Blotting papers are your friend. Skip cream blush; opt for a powder blush with a matte finish. Setting spray should be mattifying but not drying.
Dry Skin
Hydrate well before makeup. Use a hydrating primer all over. Choose a dewy foundation or tinted moisturizer. Avoid powder except under eyes. Cream blush and highlighter are ideal. Set with a hydrating mist.
Combination Skin
Prime with a balancing primer. Use different foundations if needed—matte on T-zone, hydrating on cheeks. Powder only where you shine. Cream products on cheeks, powder on T-zone.
Sensitive Skin
Choose fragrance-free, hypoallergenic products. Mineral makeup can be gentle, but avoid bismuth oxychloride if prone to irritation. Always patch test. Stick to fewer products to minimize risk.
Acne-Prone Skin
Use non-comedogenic products. Avoid heavy silicones. Spot conceal rather than full coverage. Green color corrector can neutralize redness. Look for salicylic acid in foundations if you want treatment benefits.
Budget-Friendly Options
You don’t need expensive products. Drugstore brands offer excellent lightweight foundations and cream blushes. In Pakistan, local brands like Flambeauty provide quality options. For example, the Glow Whitening Cream is affordable and doubles as a moisturizer and brightener. The Whitening Glow Soap is a gentle cleanser that preps skin. Explore more skin care products to build a routine.
If you’re on a tight budget, prioritize skincare over makeup. Good skin needs less makeup. And remember, technique matters more than price. A cheap sponge used correctly beats an expensive brush used poorly.
For more tips on skincare and beauty, check out our blog archive. Also, see our related post on handmade vs commercial soap for sensitive skin and how often to trim and file your nails.
Final Thoughts: Confidence Is Your Best Accessory
The most important element of a natural look is confidence. When you feel good in your skin, it shows in photos. Practice your routine a few times before a big event so you’re comfortable and can make adjustments. Remember that lighting, angles, and your expression matter as much as makeup. A genuine smile beats any contour.
Embrace your unique features—your freckles, your laugh lines, your natural lip color. These are what make you you. Natural makeup isn’t about hiding; it’s about enhancing. So keep it light, keep it you, and you’ll photograph beautifully every time.
Frequently Asked Questions
How can I prevent my face from looking shiny in photos?
Use a mattifying primer on your T-zone and set with a light dusting of translucent powder only where needed. Avoid heavy moisturizers before makeup, and keep blotting papers handy for touch-ups.
What's the best foundation finish for natural-looking photos?
A satin or natural finish works best because it mimics real skin. Avoid heavy matte or overly dewy finishes, which can look flat or greasy in photos.
Do I need to use a setting spray for a natural look?
Yes, a light mist of setting spray helps merge all the layers and prevents a powdery look. Choose an alcohol-free formula for a natural finish.
How can I make my natural makeup last all day in humid weather?
Use a long-wear foundation and cream products that set well. Avoid heavy powders, and always finish with a setting spray. Blot away sweat instead of adding more makeup.
Written by Mishal Rehman, owner of Flambeauty — sharing practical, professional beauty and skincare guidance.
Updated: September 2026